A well-thought out roofing installation ensures protection, energy efficiency and a beautiful aesthetic for your home. The type of roofing material you choose will depend on a number of factors including cost, climate, aesthetic and home structure.
To protect your home during the replacement process, it is best to keep pets inside and temporarily relocate anything that could get damaged or lost in the construction area. A clear schedule and open communication will also help the process go smoothly. Contact EZ Roofing of Flagler County for professional help.
The roof is a crucial part of your home, protecting it from the elements and adding structural integrity. It is an important investment, and as with any large project, the preparation process is essential to ensure the job is done right. This includes ensuring the underlying substrate is in good condition, removing debris and dirt, and making sure there is an adequate slope for water runoff. This process also includes installing underlayment, which protects the roof deck from moisture and ice.
Before the roofing team begins working, it’s a good idea to move vehicles and other exterior items that could get in the way of the work. Similarly, any furniture or decorations inside the house should be moved to a safe place where they won’t be disturbed by dust and shingle debris. It is also a good idea to cover any valuables stored in the attic with plastic or tarps.
If you have children or pets, you may want to consider boarding them or finding alternative childcare during the roofing installation. The noise from hammers and nail guns can cause vibrations in the house, and children may become anxious. Additionally, the shingles and other debris will likely scatter throughout the yard and around the house. It’s also a good idea to communicate with your neighbors about the work so they can plan accordingly.
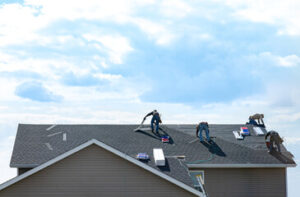
Once the prep work is complete, the roofing contractor can begin the actual installation of the new roof. First, the existing shingles are removed and the underlayment is installed. Then, the granules are placed over the roof deck. Finally, the shingles or metal panels are set in place. For asphalt shingles, they are nailed to the substrate; for metal, they are screwed in. To finish the job, flashing is installed to prevent leaks in chimneys, vents and other vulnerable areas, and ridge vents or caps are added to provide ventilation and a finished look. Cleaning up afterward is also a vital step to ensure that nails and other remnants are collected and disposed of properly. The final step involves a thorough inspection to ensure that the job is complete and there are no potential leak areas.
Sequencing
Whether you’re roofing a barn, shed or other structure, the sequence of your work can have an effect on the outcome. Residential houses are more complex structures to roof, and they often feature multiple roof sections, ridges and eaves, which can add complexity to the project. Fortunately, by following some simple installation steps, you can ensure that your roofing job goes smoothly and looks great.
Using a self-sealing bituminous membrane at the edge of your roof is an important step in ensuring that water doesn’t leak into your home. Make sure that the membrane extends halfway down the fascia board.
You should also install a kick-out flashing to divert rainwater away from where a sloped roof meets a vertical side wall. The flashing should be aluminum and extend at least 4″ down the wall surface. The kick-out flashing should be integrated with the drainage plane of the wall cladding.
Flashing
While the term flashing may be unfamiliar to many homeowners, this critical component of a roofing system is crucial for keeping the roof in good condition. Roof flashings are made from durable materials such as metal, rubber, or plastic to prevent leakage and resist corrosion in harsh weather conditions. They create a protective barrier around areas where the roof deck meets other vertical surfaces or structures such as chimneys, vent pipes, or skylights. These critical junctions or intersections are vulnerable to water penetration that could lead to structural damage and serious health issues for the home’s occupants.
There are several types of flashing that are designed to fulfill specific purposes and serve different areas of the roof. For example, valley flashing is designed to be installed in the valleys of the roof, preventing water from pooling in these areas and protecting the underlying sheathing from water intrusion. Step flashing is used to protect the area where a sloped roof meets a wall, directing water that would otherwise enter the house back outside. Counter-flashing is usually applied over step flashing to ensure a watertight seal and to add additional strength to this vulnerable area of the roof.
Other types of flashing include ridge cap flashing, which is placed above the ridge of the roof to prevent water and snow from penetrating the eaves and gutters. Dormer window flashing is another important type of flashing that is often overlooked, protecting these areas of the roof from moisture penetration that can cause mold growth and rot in the framing.
Flashings are also commonly found in the area where a shingle roof intersects with other components such as vents and skylights. These areas are susceptible to water leakage if the flashing is not properly installed, and this can result in damage to the insulation and structure of the roof.
When choosing a flashing, it is essential to consider the pipe diameter and penetration width of the roof, as well as environmental factors like temperature and proximity to saltwater. There are also several different types of flashing available, including multi-size flashings designed to accommodate various sizes of pipes and other features. The right flashing type will help to protect the roof from damage and leaks, and keep it functioning efficiently for years to come.
Installation
Roofing work will require a variety of standard tools like hammers, ladders, shingle cutters, hard hats, and scaffolding. Depending on the scope of the job, larger projects might also call for construction equipment like forklifts and tractors. You may have to temporarily relocate any items that you want to keep safe from dust and debris, including vehicles, furniture in the yard, and garden plants.
The first step in shingle installation is laying the underlayment. This barrier acts as a layer between the roof deck and shingles, protecting against water infiltration. Start at one end of the roof and roll out underlayment in horizontal courses. Make sure it overlaps the ice and water shield/ice guard membrane and valley membrane flashing by 4 inches. Finally, place the drip edge at the eave and secure it with caulking.